IBAX Development Tutorial
Getting Started Guide
Deployment
Advanced Guide
Deploy first smart contract via command line tool
We will deploy smart contracts on the IBAX blockchain via the command line tool, and learn how to invoke smart contracts. As our first smart contract, we deployed it to local test network How to deploy a local network you can refer to Network Deployment , so you can deploy and run it as you like without any overhead.
Create application
Call the contract @1NewApplication to create the application, which has an application name parameter and a modify permission parameter
1  $ ibax-cli console
2
3  Welcome to the IBAX console!
4  To exit, press ctrl-d or type exit
5  >callContract @1NewApplication {"Name": "testapp", "Conditions": "ContractConditions(\"@1DeveloperCondition\")"}
6
7  {
8    "block_id": 1217,
9    "hash": "6327161d2202c33c06d34ab4ed9b509c05fc2cbb15cf260c6d3d404a6f640028",
10   "penalty": 0,
11   "err": "31"
12 }
The following is explained by line:
- Line 1, start command line terminal
- Line 5, call the contract @1NewApplication to create an application with the
application name
testappand the application modification permission@1DeveloperConditionwith developer permission - Row 8, the block id generated by the transaction
- Line 9, the block hash generated by the transaction
- Line 10, if the transaction execution fails (0: no penalty 1: penalty)
- On line 11, if the transaction execution fails, an error text message is returned, and if the block id is returned, the err field is the id of the application
Of course if you want to see what fields and field types are available in this
contract, you can call the getContractInfo method, which will return the
contract information as follows:
>getContractInfo @1NewApplication

{
    "id": 5022,
    "state": 1,
    "tableid": "22",
    "walletid": "0",
    "tokenid": "1",
    "address": "0000-0000-0000-0000-0000",
    "fields": [
        {
            "name": "Name",
            "type": "string",
            "optional": false
        },
        {
            "name": "Conditions",
            "type": "string",
            "optional": false
        },
        {
            "name": "VotingId",
            "type": "int",
            "optional": true
        }
    ],
    "name": "@1NewApplication",
    "app_id": 1,
    "ecosystem": 1,
    "conditions": "ContractConditions(\"@1DeveloperCondition\")"
}
The fields field is the parameters of the contract, including the name of the
parameter name, type, optional, Name and Conditions are required,
VotingId is optional, refer to
contract/name API method
Writing contracts
We use Needle to write a smart
contract that We implement a simple addition operation, the source code of the
contract is as follows, we save the contract as SumMath.sim
1    contract SumMath {
2        data {
3            A int
4            B int
5        }
6        conditions {
7
8        }
9        action {
10            var sum int
11            sum = $A + $B
12            $result = sum
13        }
14    }
The following is explained by line:
- In line 1, we define a contract with the name SumMath
- Line 2, Data Section
- In lines 3-4, we define two input 64-bit integer-type parameters
A B - Line 6, Conditional Section
- Line 9, Operations Section We define a variable sum to receive the result of A+B. Assign the value of sum to result directly, but it can be shown as an example.
Create Contract
There are two ways to create a contract, the first of which is: In the first step we write a contract parameter file in json format:
{
  "ApplicationId": 31,
  "Value": "contract SumMath {\n    data {\n        A int\n        B int\n    }\n    conditions {\n\n    }\n    action {\n        var sum int\n        sum = $A + $B\n        $result = sum\n    }\n}",
  "Conditions": "ContractConditions(\"@1DeveloperCondition\")"
}
where ApplicationId is the application id, Value is the contract source
code, need to escape special characters, Conditions is the contract
modification rights
We named it SumMathParams.json
The second step calls to create a contract @1NewContract
1    >callContract @1NewContract -f=./data/SumMathParams.json
2    {
3        "block_id": 1238,
4        "hash": "f3fe7aff8a613c96299723b7e9af0682aa8cabe7becf67a485e2a77a974f58b6",
5        "penalty": 0,
6        "err": "328"
7    }
Second method: The saved contract source file is passed directly into the
contract parameters in the parameter format paramsName + - +
"file",paramsName-file as follows:
1    >callContract @1NewContract {"ApplicationId": 31, "Value-file": "SumMath.sim", "Conditions": "true"}
2    {
3        "block_id": 2055,
4        "hash": "cdf25060669cf7cba137278...26ca463fd5d458f3402a5f0137f693db",
5        "penalty": 0,
6        "err": "368"
7    }
The following is explained by line:
- Line 1: Call the contract @1NewContract to create the contract, -f uses the file to import the contract parameters
- Row 3, the block id generated by the transaction
- Line 4, the block hash generated by the transaction
- Line 5, if the transaction execution fails (0: no penalty 1: penalty)
- Line 6, if the transaction execution fails, an error text message is returned, and if the block id is returned, the err field is the id of the contract
Let's try calling the contract we just deployed
1  >callContract @5SumMath {"A":1, "B":2}
2
3  {
4      "block_id": 1239,
5      "hash": "7fa09da0b9f65634119a910f9d91aaf4927208278efd62961499ef7e4f4c8c9c",
6      "penalty": 0,
7      "err": "3"
8  }
The call is completed and the result is as expected, as explained below by line:
- The first line calls the contract, here we deploy the contract to the
ecosystem with ecosystem id 5, of course, if the current ecosystem id is 5, in
the same ecosystem, you can also call
callContract SumMath {"A":1, "B":2}in this way - Line 3, the block id generated by the transaction
- Line 4, the block hash generated by the transaction
- Line 5, if the transaction execution fails (0: no penalty 1: penalty)
- Line 6, if the transaction execution fails, an error text message is returned,
and if the block id is returned, the err field is the result of the contract,
which is the value of
$result
Command Line Tool Eco Development
In this tutorial, you will learn how to:
- 1.Create Ecosystem
- 2.Create Application
- 3.Create Table
- 4.Create Application Parameters
- 5.Create & Deploy Contract
- 6.Create Ecosystem Parameters
- 7.Add Localization
- 8.Modify Contract
- 9.Modify data table permissions
In order to understand more clearly how the IBAX ecosystem and applications are
like and what they do, it is preferred that we understand where the ecosystem
and applications should belong, and we can understand better with a simple mind
map: 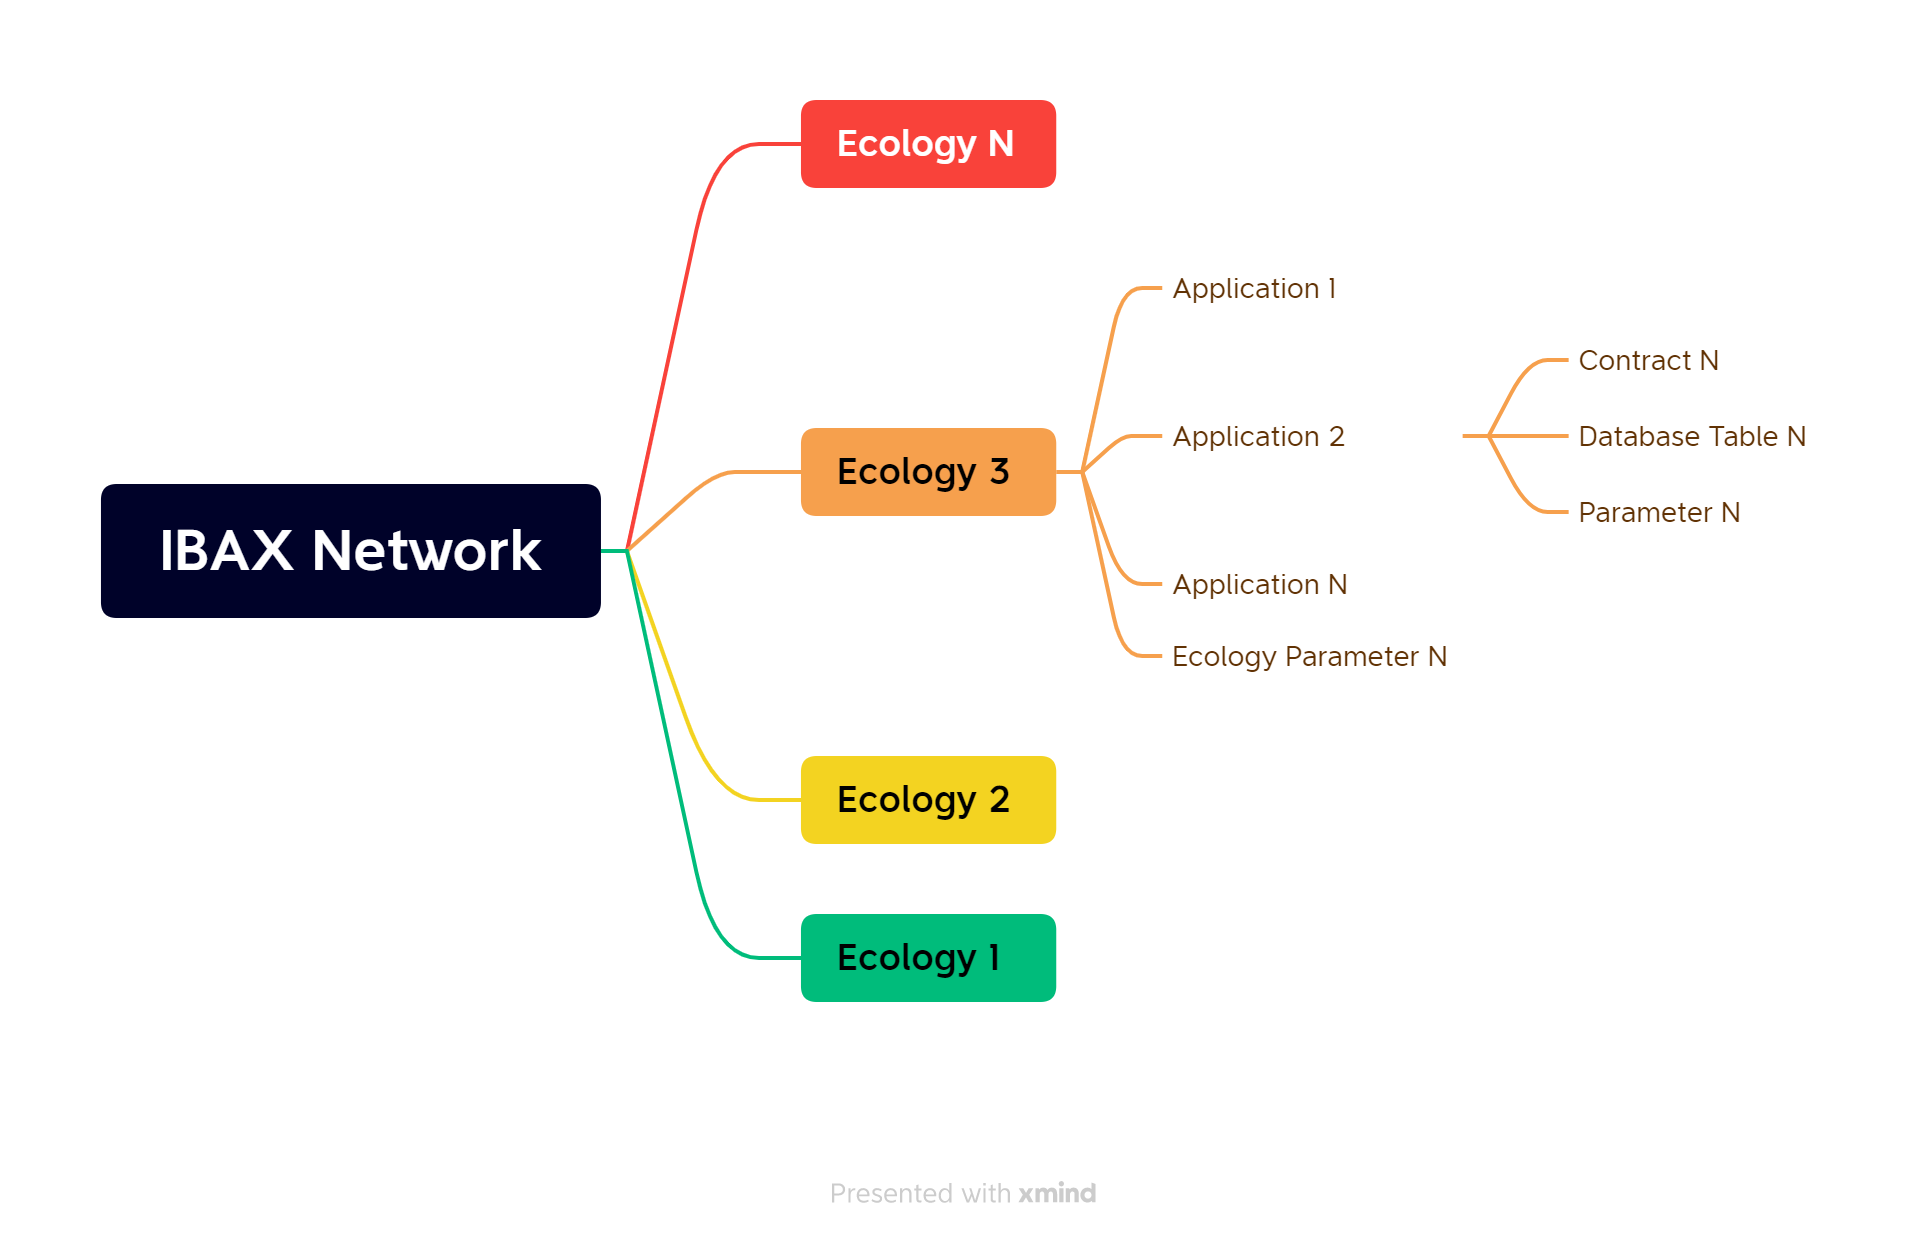
It can be seen that IBAX networks can have many Ecosystems. Each ecosystem can have multiple applications. Each application has contract. Tables. Ecology has ecosystem parameters, application has application parameters
Step 1 Create Ecosystem
We start by creating an ecosystem using the
command line tool, calling the contract
@1NewEcosystem. If you want to change the ecosystem name, you can call the
@1EditEcosystemName contract.
1    $ ibax-cli console
2
3    Welcome to the IBAX console!
4    To exit, press ctrl-d or type exit
5    >callContract @1NewEcosystem {"Name": "goodBoy school"}
6
7    {
8        "block_id": 1199,
9        "hash": "a1dc90c1772545c16394b9521...227676b27b145743556a8973dd",
10       "penalty": 0,
11       "err": "18"
12   }
The following is explained by line:
- Line 1, which starts the command line console program
- Line 5, call the contract
@1NewEcosystemto create an ecosystem with the name test ecosystem - Line 8, the block id generated by the transaction
- Line 9, the block hash generated by the transaction
- Line 10, if the transaction execution fails (0: no penalty 1: penalty)
- Line 11, if the transaction execution fails, an error text message is
returned, and if the block id is returned, the err field is the id of the
ecosystem as
18
Then we configure the command tool config.yml, set ecosystem to the created
ecid 18 and restart the command line console program
>exit
INFO[0002] Exit

$ vim data/config.yml

$ ibax-cli console

Welcome to the IBAX console!
To exit, press ctrl-d or type exit
>
Step 2 Create Application
Call the contract @1NewApplication to create the application, which has an
application name parameter and a modify
Permission Parameter
1  >callContract @1NewApplication {"Name": "GradesRecorder", "Conditions": "ContractConditions(\"@1DeveloperCondition\")"}
2
3  {
4     "block_id": 1246,
5     "hash": "85ab8953d26d0d1047fc610866115331babfaf88c80792d50b41826185c9f6f8",
6     "penalty": 0,
7     "err": "47"
8  }
If you need to modify the application permissions, you can call the
EditApplication contract
The following is explained by line:
- Line 1, call the contract @1NewApplication to create an application, the
application name is
GradesRecorder, the application modification permission is developer permission@1DeveloperCondition - Line 4, the block id generated by the transaction
- Line 5, the block hash generated by the transaction
- Line 6, if the transaction execution fails (0: no penalty 1: penalty)
- Line 7, if the transaction execution fails, an error text message is returned,
and if the block id is returned, the err field the id of the application is
47
Let's write a simple example of an application that keeps track of students'
grades. The data table fields include student information, grade grade, class
class, subject grades mathematics,physics,literature, and Composite score
overall_score, rating score, creation timestamp (ms) created_at
Step 3 Create Table
In the first step we write a contract parameter file in json format:
{
  "ApplicationId": 47,
  "Name": "grade_info",
  "ColumnsArr": [
    "student",
    "grade",
    "class",
    "mathematics",
    "physics",
    "literature",
    "overall_score",
    "score",
    "created_at"
  ],
  "TypesArr": [
    "varchar",
    "number",
    "number",
    "number",
    "number",
    "number",
    "number",
    "varchar",
    "number"
  ],
  "InsertPerm": "ContractConditions(\"MainCondition\")",
  "UpdatePerm": "ContractConditions(\"MainCondition\")",
  "ReadPerm": "true",
  "NewColumnPerm": "ContractConditions(\"MainCondition\")"
}
where ApplicationId is the application id,Name is the name of the created
data table test_teble. ColumnsArr is an array of data table fields,
TypesArr is the type of data table fields, including 9
types
varchar,character,json,number,datetime,double,money,text,bytea,
the field name and the field type are one-to-one correspondence. InsertPerm
for data table new entry permission, UpdatePerm for data table update entry
permission, ReadPerm for data table data read permission, NewColumnPerm for
new data table field permission Referring to
Permission Control
, hereContractConditions(\"MainCondition\") is available for the current
ecosystem creator.
We name it createTable.json, and then call the contract to create the data table
@1NewTableJoint
>callContract @1NewTableJoint -f ./createTestTable.json
Modify data table field permissions
We can modify the data table field permissions, data table field permissions
include read permissions and update permissions, where read permissions, in the
contract using DBFind.Columns filter fields or interfaces such as
list query, if there is
no permission, it will report a permission error. The update permission is the
permission to update the data table fields. We set the student field read and
update permissions to false, but of course it can be set to be operable by
some contract. Call the @1EditColumn contract to modify the data table field
permissions
>callContract @1EditColumn {"TableName": "grade_info", "Name": "student", "UpdatePerm": "false", "ReadPerm": "false"}
We can create several application
parametersgrade_best_type,grade_type_a+,grade_type_a,grade_type_b+,grade_type_b,grade_type_c,
grade rating type
Step 4 Create Application Parameters
Call the contract @1NewAppParam to create the application parameters, if you
want to modify the application parameters you can call the contract
@1EditAppParam.
>callContract @1NewAppParam {"ApplicationId": 47, "Name": "grade_best_type", "Value": "A+", "Conditions": "ContractConditions(\"MainCondition\")"}
>callContract @1NewAppParam {"ApplicationId": 47, "Name": "grade_type_a+", "Value": "{\"max\": 101,\"min\": 90}", "Conditions": "ContractConditions(\"MainCondition\")"}
>callContract @1NewAppParam {"ApplicationId": 47, "Name": "grade_type_a", "Value": "{\"max\": 90,\"min\": 80}", "Conditions": "ContractConditions(\"MainCondition\")"}
>callContract @1NewAppParam {"ApplicationId": 47, "Name": "grade_type_b+", "Value": "{\"max\": 80,\"min\": 70}", "Conditions": "ContractConditions(\"MainCondition\")"}
>callContract @1NewAppParam {"ApplicationId": 47, "Name": "grade_type_b", "Value": "{\"max\": 70,\"min\": 60}", "Conditions": "ContractConditions(\"MainCondition\")"}
>callContract @1NewAppParam {"ApplicationId": 47, "Name": "grade_type_c", "Value": "{\"max\": 60,\"min\": 0}", "Conditions": "ContractConditions(\"MainCondition\")"}
where grade_best_type is the best rating type. grade_type_a+ is the
condition triggered by the rating A+, when the score is greater than or equal
to 90 and less than 101, the rating isA+, other parameters are similar
Step 5 Create Contract Deploy Contract
We create a contract to record the student's grade information and final rating
for each subject, and enter the student's grade class and grade for each subject
when entering the information. Based on the input scores of each subject, the
average calculation is done to get the overall score overallScore and the
final ratingscore. When the contract is called, it will create a record to the
data table we just created grade_info
First we write a contract and name it NewRecord.sim
1 contract NewRecord {
2       data {
3         Student string
4         Grade int
5         Class int
6         Mathematics int
7         Physics int
8         Literature int
9       }
10     func getScore(a b c int) map{
11          var m map
12          var overallScore int
13          overallScore = (a+b+c) / 3
14          m["overallScore"] = overallScore
15          if overallScore >= $gradeTypeABest["min"] && overallScore < $gradeTypeABest["max"] {
16              m["score"] = "A+"
17          }elif overallScore >= $gradeTypeA["min"] && overallScore < $gradeTypeA["max"] {
18              m["score"] = "A"
19          }elif overallScore >= $gradeTypeBBest["min"] && overallScore < $gradeTypeBBest["max"] {
20              m["score"] = "B+"
21          }elif overallScore >= $gradeTypeB["min"] && overallScore < $gradeTypeB["max"] {
22              m["score"] = "B"
23          }elif overallScore >= $gradeTypeC["min"] && overallScore < $gradeTypeC["max"]{
24              m["score"] = "C"
25          }else{
26              m["score"] = "Notset"
27          }
28          return m
29      }
30      func safeJsonDecode(m string) map {
31          var res map
32          if Size(m) > 0 {
33             res = JSONDecode(m)
34          }
35          return res
36      }
37
38      conditions {
39          if Size($Student) == 0 {
40            warning "Student Can not be empty"
41          }
42          if $Class <= 0{
43              warning "Class cannot be less than or equal to zero"
44          }
45          if $Grade <= 0{
46              warning "Grade cannot be less than or equal to zero"
47          }
48          if $Mathematics < 0 {
49              warning "Mathematics cannot be less than zero"
50          }
51          if $Physics < 0 {
52              warning "Physics cannot be less than zero"
53          }
54          if $Literature < 0 {
55              warning "Literature cannot be less than zero"
56          }
57          if $Mathematics > 100 || $Physics > 100 ||  $Literature > 100{
58              warning "Score cannot exceed 100"
59          }
60          var app map
61          app = DBFind("@1applications").Columns("id,ecosystem").Where({"ecosystem": 18,"name":"GradesRecorder","deleted":0}).Row()
62          if !app {
63              warning LangRes("@1app_not_found")
64          }
65
66          var app_id int
67          app_id = Int(app["id"])
68          $eId = Int(app["ecosystem"])
69          $gradeBestType = AppParam(app_id, "grade_best_type", $eId)
70          $gradeTypeABest = safeJsonDecode(AppParam(app_id, "grade_type_a+", $eId))
71          $gradeTypeA = safeJsonDecode(AppParam(app_id, "grade_type_a", $eId))
72          $gradeTypeBBest = safeJsonDecode(AppParam(app_id, "grade_type_b+", $eId))
73          $gradeTypeB = safeJsonDecode(AppParam(app_id, "grade_type_b", $eId))
74          $gradeTypeC = safeJsonDecode(AppParam(app_id, "grade_type_c", $eId))
75      }
76      action {
77          var m map
78          m = getScore($Mathematics,$Physics,$Literature)
79          var in map
80          in["student"] = $Student
81          in["class"] = $Class
82          in["grade"] = $Grade
83          in["mathematics"] = $Mathematics
84          in["physics"] = $Physics
85          in["literature"] = $Literature
86          in["overall_score"] = m["overallScore"]
87          in["score"] = m["score"]
88          in["created_at"] = $time
89          DBInsert("@"+ Str($eId)+"grade_info", in)
90      }
91  }
The following is explained by line:
- Line 2, data section defines the input
parameters
Studentstudent name,Gradegrade,Classclass,Mathematicsmath score,PhysicsPhysics score,LiteratureLiterature score - Line 10, the getScore function, produces a composite score and final rating based on each subject's score
- Line 30, safeJsonDecode function, json decode the string and convert to map
- Line 38, conditional section
- Line 39, operation section
As you can see, when the contract is called, it first goes through the
conditional part, verifying that the contract input parameters are valid, such
as whether the student name if Size($Student) == 0 { is empty (line 39), and
if it is, then an error message is returned "Student Can not be empty" (line
30), after all input parameters have been verified, on line 61, use
DBFind to retrieve the information from the
database for the application with the ecid 18 and the application name
GradesRecorder and the application information with deleted=0 is not
deleted. Lines 69-74, use AppParam to retrieve
the application parameters, e.g.
$gradeBestType = AppParam(app_id, "grade_best_type", $ eId) (line 69). If the
application parameter is stored in json format, such as grade_type_a, you can
refer to
$gradeTypeABest = safeJsonDecode(AppParam(app_id, "grade_type_a+", $eId)),
which will get the application parameter by safeJsonDecode function to map
format
Then execute to the operation part, call the getScore function to get the
resulting composite score and final rating (line 10), use map to store, line 79,
define a map to store student achievement information, and
DBInsert Insert data to data
table@18grade_info.
There are two ways to create a contract, the first of which is: First we write a contract parameter file in json format:
{
  "ApplicationId": 47,
  "Value": "contract NewRecord {\n    data {\n        Student string\n        Grade int\n        Class int\n        Mathematics int\n        Physics int\n        Literature int\n    }\n    func getScore(a b c int) map{\n        var m map\n        var overallScore int\n        overallScore = (a+b+c) / 3\n        m[\"overallScore\"] = overallScore\n        if overallScore >= $gradeTypeABest[\"min\"] && overallScore < $gradeTypeABest[\"max\"] {\n            m[\"score\"] = \"A+\"\n        }elif overallScore >= $gradeTypeA[\"min\"] && overallScore < $gradeTypeA[\"max\"] {\n            m[\"score\"] = \"A\"\n        }elif overallScore >= $gradeTypeBBest[\"min\"] && overallScore < $gradeTypeBBest[\"max\"] {\n            m[\"score\"] = \"B+\"\n        }elif overallScore >= $gradeTypeB[\"min\"] && overallScore < $gradeTypeB[\"max\"] {\n            m[\"score\"] = \"B\"\n        }elif overallScore >= $gradeTypeC[\"min\"] && overallScore < $gradeTypeC[\"max\"]{\n            m[\"score\"] = \"C\"\n        }else{\n            m[\"score\"] = \"Notset\"\n        }\n        return m\n    }\n    func safeJsonDecode(m string) map {\n        var res map\n        if Size(m) > 0 {\n            res = JSONDecode(m)\n        }\n        return res\n    }\n\n    conditions {\n        if Size($Student) == 0 {\n            warning \"Student Can not be empty\"\n        }\n        if $Class <= 0{\n            warning \"Class cannot be less than or equal to zero\"\n        }\n         if $Grade <= 0{\n            warning \"Grade cannot be less than or equal to zero\"\n        }\n        if $Mathematics < 0 {\n            warning \"Mathematics cannot be less than zero\"\n        }\n        if $Physics < 0 {\n            warning \"Physics cannot be less than zero\"\n        }\n        if $Literature < 0 {\n            warning \"Literature cannot be less than zero\"\n        }\n        if $Mathematics > 100 || $Physics > 100 ||  $Literature > 100{\n            warning \"Score cannot exceed 100\"\n        }\n        var app map\n        app = DBFind(\"@1applications\").Columns(\"id,ecosystem\").Where({\"ecosystem\": 18,\"name\":\"GradesRecorder\",\"deleted\":0}).Row()\n        if !app {\n            warning LangRes(\"@1app_not_found\")\n        }\n\n        var app_id int\n        app_id = Int(app[\"id\"])\n        $eId = Int(app[\"ecosystem\"])\n        $gradeBestType = AppParam(app_id, \"grade_best_type\", $eId)\n        $gradeTypeABest = safeJsonDecode(AppParam(app_id, \"grade_type_a+\", $eId))\n        $gradeTypeA = safeJsonDecode(AppParam(app_id, \"grade_type_a\", $eId))\n        $gradeTypeBBest = safeJsonDecode(AppParam(app_id, \"grade_type_b+\", $eId))\n        $gradeTypeB = safeJsonDecode(AppParam(app_id, \"grade_type_b\", $eId))\n        $gradeTypeC = safeJsonDecode(AppParam(app_id, \"grade_type_c\", $eId))\n    }\n    action {\n        var m map \n        m = getScore($Mathematics,$Physics,$Literature)\n        var in map\n        in[\"student\"] = $Student\n        in[\"class\"] = $Class\n        in[\"grade\"] = $Grade\n        in[\"mathematics\"] = $Mathematics\n        in[\"physics\"] = $Physics \n        in[\"literature\"] = $Literature \n        in[\"overall_score\"] = m[\"overallScore\"]\n        in[\"score\"] = m[\"score\"]\n        in[\"created_at\"] = $time\n        DBInsert(\"@\"+ Str($eId)+\"grade_info\", in)\n    }\n}",
  "Conditions": "ContractConditions(\"@1DeveloperCondition\")"
}
Where ApplicationId is the application id, which needs to be escaped for
special characters, and Conditions is the contract modification permission.
Value contract source code, which we save as NewRecordParams.json:
After writing the contract, we need to deploy the contract by calling
CreateContract@1NewContract
1    >>callContract @1NewContract -f=./data/NewRecordParams.json
2    {
3        "block_id": 1262,
4        "hash": "d896f12f685835f6cf71705e1ba...4d8bcc0a1406f7b0b6482b2d230fc",
5        "penalty": 0,
6        "err": "348"
7    }
The following is explained by line:
- Line 1: call contract
@1NewContractto create the contract, -f uses the file to import the just created fileNewRecord.jsonas the contract parameter - Line 3, the block id generated by the transaction
- Line 4, the block hash generated by the transaction
- Line 5, if the transaction execution fails (0: no penalty 1: penalty)
- Line 6, if the transaction execution fails, an error text message is returned,
and if the block id is returned, the err field the id of the contract is
348
Second method: The saved contract source file is passed directly into the
contract parameters in the parameter format paramsName + - +
"file",paramsName-file as follows:
callContract @1NewContract {"ApplicationId": 47, "Value-file": "NewRecord.sim", "Conditions": "ContractConditions(\"@1DeveloperCondition\ ")"}
Let's try to call the contract we just created
1  >callContract @18NewRecord {"Student": "tom", "Grade": 1, "Class": 1, "Mathematics": 18, "Physics": 57, "Literature": 93}
2
3  {
4     "block_id": 1263,
5     "hash": "1b964a47fe6c5fd43ea55a752d01edb5ad576432fd6f63315344d87999a0473d",
6     "penalty": 0,
7     "err": ""
8  }
The call is complete, and then we check to see if the data table has saved a record
>getList @18grade_info
{
    "count": 1,
    "list": [
        {
            "class": "1",
            "created_at": "1683698914109",
            "grade": "1",
            "id": "9",
            "literature": "93",
            "mathematics": "18",
            "overall_score": "56",
            "physics": "57",
            "score": "C",
            "student": "tom"
        }
    ]
}
You can see that there is already a record in the data table, student tom with
an overall rating of 56 and a grade of C
The above example is only for study and research purposes, you need to change the relevant parameters according to the actual situation, such as the data table write permission, contract modification permission, etc.
For example, if we want to specify that only one person can call this new record
contract and no one else can call it, we can set an ecosystem parameter
new_record_account
Step 6 Create Ecosystem Parameters
Calling the contract @1NewParameter will create the eco-parameter
new_record_account in the @1parameters table, if you need to modify the
eco-parameter you can call @1EditParameter.
>callContract @1NewParameter {"Name": "new_record_account", "Value": "6667782293976713160", "Conditions": "ContractConditions(\"MainCondition\")"}

{
    "block_id": 1416,
    "hash": "12fc87ce6a70e2fc993ab9ffe623311f1c50edd1157595ce6183c38c93960cae",
    "penalty": 0,
    "err": "273"
}
We create an ecosystem parameter new_record_account, set the value to keyId
6667782293976713160, modify the permission
toContractConditions("MainCondition") which means the current ecosystem
creator can modify When the transaction is executed successfully, the ecosystem
parameter id of the "err" field is 273.
Step 7 add localization
You can call the @1NewLangJoint contract to create the localization
parameteraccount_not_access, which will create the parameter in
the@1languages table, and you can modify the localization parameter
via@1EditLangJoint.
callContract @1NewLangJoint {"Name": "account_not_access", "LocaleArr": ["en", "ja"], "ValueArr": ["Sorry, you do not have access to this action", "申し訳ありませんが、このアクションにアクセスする権限がありません"]}
Step 8 Modify the contract
Next, we need to modify the conditions section of the contract source code by
adding the following code to conditions
conditions {
  if EcosysParam("new_record_account") != $key_id {
      warning LangRes("account_not_access")
  }
}
Call to modify the contract @1EditContract, where Id is the contract id,
Value: is the contract source code
>callContract @1EditContract {"Id": 348, "Value": "contract NewRecord {\n data {\n Student string\n Grade int\n Class int\n Mathematics int\n Physics int\n Literature int\n }\n func getScore(a b c int) map{\n var m map\n var overallScore int\n overallScore = (a+b+c) / 3\n m[\"overallScore\"] = overallScore\n if overallScore >= $gradeTypeABest[\"min\"] && overallScore < $gradeTypeABest[\"max\"] {\n m[\"score\"] = \"A+\"\n }elif overallScore >= $gradeTypeA[\"min\"] && overallScore < $gradeTypeA[\"max\"] {\n m[\"score\"] = \"A\"\n }elif overallScore >= $gradeTypeBBest[\"min\"] && overallScore < $gradeTypeBBest[\"max\"] {\n m[\"score\"] = \"B+\"\n }elif overallScore >= $gradeTypeB[\"min\"] && overallScore < $gradeTypeB[\"max\"] {\n m[\"score\"] = \"B\"\n }elif overallScore >= $gradeTypeC[\"min\"] && overallScore < $gradeTypeC[\"max\"]{\n m[\"score\"] = \"C\"\n }else{\n m[\"score\"] = \"Notset\"\n }\n return m\n }\n func safeJsonDecode(m string) map {\n var res map\n if Size(m) > 0 {\n res = JSONDecode(m)\n }\n return res\n }\n\n conditions {\n if EcosysParam(\"new_record_account\") != $key_id {\n warning LangRes(\"account_not_access\")\n }\n if Size($Student) == 0 {\n warning \"Student Can not be empty\"\n }\n if $Class <= 0{\n warning \"Class cannot be less than or equal to zero\"\n }\n if $Grade <= 0{\n warning \"Grade cannot be less than or equal to zero\"\n }\n if $Mathematics < 0 {\n warning \"Mathematics cannot be less than zero\"\n }\n if $Physics < 0 {\n warning \"Physics cannot be less than zero\"\n }\n if $Literature < 0 {\n warning \"Literature cannot be less than zero\"\n }\n if $Mathematics > 100 || $Physics > 100 || $Literature > 100{\n warning \"Score cannot exceed 100\"\n }\n var app map\n app = DBFind(\"@1applications\").Columns(\"id,ecosystem\").Where({\"ecosystem\": 18,\"name\":\"GradesRecorder\",\"deleted\":0}).Row()\n if !app {\n warning LangRes(\"@1app_not_found\")\n }\n\n var app_id int\n app_id = Int(app[\"id\"])\n $eId = Int(app[\"ecosystem\"])\n $gradeBestType = AppParam(app_id, \"grade_best_type\", $eId)\n $gradeTypeABest = safeJsonDecode(AppParam(app_id, \"grade_type_a+\", $eId))\n $gradeTypeA = safeJsonDecode(AppParam(app_id, \"grade_type_a\", $eId))\n $gradeTypeBBest = safeJsonDecode(AppParam(app_id, \"grade_type_b+\", $eId))\n $gradeTypeB = safeJsonDecode(AppParam(app_id, \"grade_type_b\", $eId))\n $gradeTypeC = safeJsonDecode(AppParam(app_id, \"grade_type_c\", $eId))\n }\n action {\n var m map \n m = getScore($Mathematics,$Physics,$Literature)\n var in map\n in[\"student\"] = $Student\n in[\"class\"] = $Class\n in[\"grade\"] = $Grade\n in[\"mathematics\"] = $Mathematics\n in[\"physics\"] = $Physics \n in[\"literature\"] = $Literature \n in[\"overall_score\"] = m[\"overallScore\"]\n in[\"score\"] = m[\"score\"]\n in[\"created_at\"] = $time\n DBInsert(\"@\"+ Str($eId)+\"grade_info\", in)\n }\n}"}
Step 9 Modify data table permissions
Here we need to change the insert permission of the data table, the original
permission ContractConditions("MainCondition") for the ecreator, and the
contract setting new_record_account is not the ecreator. So just change
ContractConditions("MainCondition") to specify that the contract can operate
on ContractAccess("@18NewRecord"). Call the contract @1EditTable to modify
the data table permissions
>callContract @1EditTable {"Name": "@18grade_info", "InsertPerm": "ContractAccess(\"@18NewRecord\")", "UpdatePerm": "ContractConditions(\"MainCondition\")", "ReadPerm": "true", "NewColumnPerm": "ContractConditions(\"MainCondition\")"}
Then call the contract you just modified and create a new record
1  >callContract @18NewRecord {"Student": "tom", "Grade": 1, "Class": 1, "Mathematics": 18, "Physics": 57, "Literature": 93}
2
3  {
4      "block_id": 1435,
5      "hash": "7d4b06d3738133f9c2ec775935478cd2d6c20fd04eca275769afd0f8e6a4f687",
6      "penalty": 1,
7      "err": "{\"type\":\"warning\",\"error\":\"Sorry, you do not have access to this action\"}"
8  }
You can see that the localization parameter we just set,account_not_access, is
working
We found that the permission error is reported, the current user does not have
permission to operate, we switch to the account with keyId
6667782293976713160, we can get the current user's information through the
command line toolaccount info Set up the command line tool config.yml and
switch to the account with keyId 6667782293976713160 After the setup is
complete, call the contract again
>callContract @18NewRecord {"Student": "tini", "Grade": 1, "Class": 3, "Mathematics": 69, "Physics": 89, "Literature": 98}

{
    "block_id": 1436,
    "hash": "93327dafb7bae9f9f66718eb87020a7bca4c00060f4bd0a243b49eea304c52e6",
    "penalty": 0,
    "err": ""
}
The call completes, querying the data table via getList @18grade_info, and the
result is as expected
We hope this article has helped you learn more about how the IBAX network works
and how to write clear and secure Needle code.
Deploy application using command line tools
In this tutorial, you will learn how to:
Before starting this tutorial, you need to have an application of your own and know the concept of ecosystem and application, you can refer to Getting Started Guide We will import the application on the IBAX blockchain via the command line tool. Exporting an application
Export Application
Call account info to query the current account information, here the login
ecid is 9, call getList command to query the current ecid which applications
$ ibax-cli console

Welcome to the IBAX console!
To exit, press ctrl-d or type exit
>account info
{
    "public_key": "04d11ea197fe23152562c6f54c4...889c074dfd9080099982d8b2d4d100315e1cebc7",
    "ecosystem_id": 9,
    "key_id": 6660819...78795186,
    "account": "0666-0819-...-7879-5186"
}

>getList @1applications -w={"ecosystem": 9}

{
    "count": 6,
    "list": [
        {
            "conditions": "true",
            "deleted": "0",
            "ecosystem": "9",
            "id": "36",
            "name": "testapp",
            "uuid": "00000000-0000-0000-0000-000000000000"
        }
        ...
    ]
}
We can see that the current ecosystem has 6 applications, we use theexport
command to export the application with id of 36
>export 36 -f=./data.json

{
    "name": "./data.json",
    "type": "application/json",
    "value": ""
}
The -f parameter here saves the exported application to the data.json file in
the current directory. If there is no -f parameter, the application data will be
output in the command terminal
The export command encapsulates the steps to export an application. You can
use the above command to export an application, or use the following steps, as
follows: Calling the contract @1ExportNewApp to export a new application will
generate a record in the 1_buffer_data table for the exported application
>callContract @1ExportNewApp {"ApplicationId": 36}
Call the contract @1Export to export the application, find the selected
application in the 1_buffer_data table, and export all application resources
to the generated json string. The generated json string will be written to the
1_binaries table of the current ecosystem
>callContract @1Export
Query the data in the 1_binaries table with the getList command
>getList @1binaries -w={"name": "export", "account": "0666-0819-...-7879-5186", "ecosystem": 9, "app_id": 36} -l=1 -c="id,hash"

{
    "count": 1,
    "list": [
        {
            "hash": "8542cb57b77e0ae2c...92c3e05dbbe35ab646789be5b8ba8",
            "id": "14"
        }
    ]
}
Get the binary id and hash Call the binaryVerify command to export the binary
file
>binaryVerify 14 8542cb57b77e0ae2c...92c3e05dbbe35ab646789be5b8ba8 -f=./data.json

{
    "name": "./data.json",
    "type": "application/json",
    "value": ""
}
Import Application
Use the import command to import an application, with the -f parameter to
specify the application file to be imported
$ ibax-cli console

Welcome to the IBAX console!
To exit, press ctrl-d or type exit

>import -f . /data.json
The import command encapsulates the steps to import an application, you can
use the above command to import an application
Or use the following steps, which, for ease of study and research, are as follows:
- Step 1 Calling the contract
@1ImportUploadto import a new application will generate a record in the1_buffer_datatable for the exported application@1ImportUploadThe contract parameterDataisfiletype. Contains the keywordsNamefile name (string),MimeTypefile type (string),Body([]byte) file content You need to base64 encode the application file data and pass it intoBody, you can use thebase64Encodecommand to base64 encode it
>base64Encode -f=./data.json

Encode:ewoJIm5hbWUiOiAid...CQkJIlR5cGUiOiAiY29udHJhY3RzIiwKCQkJIk5hbWUiOiAiSGVsbG9Xb3JsZCIsCgkJCSJWYWx1ZSI6...

>callContract @1ImportUpload {"Data": {"Name": "filename", "MimeType": "mimeType", "Body": "ewoJIm5hbWUiOiAid...CQkJIlR5cGUiOiAiY29udHJhY3RzIiwKCQkJIk5hbWUiOiAiSGVsbG9Xb3JsZCIsCgkJCSJWYWx1ZSI6..."}}
- Step 2 After the call is completed, use the
getListcommand to query the data in the1_buffer_datatable
>getList @1buffer_data -w={"key": "import", "account": "0666-0819-xxxx-7879-5186", "ecosystem": 19} -l=1 -c=value->'data'

{
    "count": 1,
    "list": [
        {
            "id": "22",
            "value.data": "[{"Data": "[a,b]"}, {"Data": "[c,d]"}]"
        }
    ]
}
- Step 3 Assemble the data in value.data->Data into a one-dimensional array,
[a,b,c,d]. Then create a contract parameters file
importParams.json, with the following content:
{ "Data": "[a,b,c,d]" }
- Step 4 Call the contract
@1Importto import the application data
>callContract @1Import -f=./importParams.json
Ecosystem configuration using command line tool
In this tutorial, you will learn how to:
- Apply to join the ecosystem
- Add ecosystem members
- Freezing of accounts
- Role management
- Issuance of Token
- Eco Deduction
- DAO Governance Ecology
Before starting this tutorial, you need to have an application of your own and know the concept of ecosystem and application, you can refer to Getting Started Guide We will do the ecosystem configuration on the IBAX blockchain via command line tool
Apply to join the ecosystem
We can call the @1MembershipRequest contract to request to join the ecosystem
The following example:
>callContract @1MembershipRequest {"EcosystemId": 19}
request to join the ecosystem with ecosystem id 19, the @1MembershipRequest
contract makes a restriction on calling the ecosystem, only in the base
ecosystem can be called When the application is successful, the target ecosystem
manager will receive an application, and only when the application is approved
by the ecosystem manager will it be considered as joining the target ecosystem.
Of course, if the target ecosystem is public, you can join the target ecosystem
directly
Add ecosystem members
When the ecosystem is just created, the ecosystem member is only the ecosystem
creator, when you need to invite other members to join, you need to know the
public key of the invited person, and then call the contract @1MembershipAdd
to add members
>callContract @1MembershipAdd {"Keys": "04f2c1780ca0aa0f343d0e541c77811...3b0d5bf3a9903253aad6e78c966b5f91ffb32703884020"}
If the ecosystem is public and allows anyone to join, you can set the ecosystem
parameter free_membership = 1, which is not public by default. Once set up,
you don't need to be approved to join your ecosystem
>callContract @1NewParameter {"Name": "free_membership", "Value": "1", "Conditions": "ContractConditions(\"MainCondition\")"}
If you don't set the parameter free_membership, when other members apply to
join your ecosystem, you will receive an application notification.
Call @1MembershipDecide contract approval application, contract parameters
NotificId is the notification id, 'Accept' is the resolution mark, resolution
mark 1 is passed
>callContract @1MembershipDecide {"NotificId": 6, "Accept": 1}
Freezing of accounts
Call @1DeleteMember contract to freeze the account, note that this operation
cannot be restored
>callContract @1DeleteMember {"MemberAccount": "1539-2715-xxxx-1679-5385"}
Role management
New role creation
Call @1RolesCreate contract to create a new role, role name student, type
2 (1 - Assignable 2 - Elected by vote type 3 - System)
>callContract @1RolesCreate {"Name": "student", "Type": 2}
{
    "block_id": 1685,
    "hash": "5321f2231a...d0d80158b62766395f14d0ff7",
    "penalty": 0,
    "err": "21"
}
The return result contains the role id 21
Adding Role Members
There are two methods, the first method, the ecosystem member to initiate the
application, call the contract @1RolesRequest request to add as a member of
the role, where Rid is the role id
>callContract @1RolesRequest {"Rid": 21}
In the second method, the role manager assigns role members, and the role
manager calls the contract @1RolesAssign to add members to the role
>callContract @1RolesAssign {"MemberAccount": "0666-7782-xxxx-7671- 3160", "Rid": 21}
Delete role members
First we see what members a role has, which we can query via getList, as follows:
>getList @1roles_participants -w={"ecosystem": 18, "role->id": "21", "deleted": 0}

{
    "count": 3,
    "list": [
        {
            "appointed": "{\"account\": \"1273-2644-xxxx-5846-6598\", \"image_id\": \"0\", \"member_name\": \"founder\"}",
            "date_created": "1684916023",
            "date_deleted": "0",
            "deleted": "0",
            "ecosystem": "18",
            "id": "21",
            "member": "{\"account\": \"1273-2644-xxxx-5846-6598\", \"image_id\": \"0\", \"member_name\": \"founder\"}",
            "role": "{\"id\": \"20\", \"name\": \"teacher\", \"type\": \"1\", \"image_id\": \"0\"}"
        }
        ...
    ]
}
where the where condition ecosystem specifies ecosystem, role->id
specifies the role id, and deleted: 0 specifies not deleted. We can see that
we have 3 rows, if we want to remove the role with member
1273-2644-xxxx-5846-6598, that is, the role with id of 21. Administrators
can call the contract @1RolesUnassign to remove role members, as follows
>callContract @1RolesUnassign {"RowId": 21}
Modify Role Manager
Let's look at the current ecosystem roles
>getList @1roles -w={"ecosystem": 18}

{
    "count": 5,
    "list": [
        {
            "company_id": "0",
            "creator": "{\"account\": \"1273-2644-xxxx-5846-6598\", \"image_id\": \"0\", \"member_name\": \"founder\"}",
            "date_created": "1684910917",
            "date_deleted": "0",
            "default_page": "",
            "deleted": "0",
            "ecosystem": "18",
            "id": "20",
            "image_id": "0",
            "role_name": "teacher",
            "role_type": "1",
            "roles_access": "[]"
        }
        ...
    ]
}
where roles_access is the administrative role for the current role, which is
an array and can have more than one. We add an administrative role to the role
teacher by calling the @1RolesAccessManager contract, where the contract
parameters Action administrative operator (clean, remove, add),Rid the
role ID to be managed, ManagerRid the Rid Manager of the role
>callContract @1RolesAccessManager {"Action": "add", "Rid": 20, "ManagerRid": 13}

{
    "block_id": 1745,
    "hash": "e2eb8ff0dc309ec7652db...bbbe58bca4ca574804e46c2f63653eb73104",
    "penalty": 0,
    "err": ""
}
Delete Role
We can call the @1RolesDelete contract to delete roles, where the contract
parameters Rid is the ID of the role to be managed and Ops is the operator
(D is delete R is restore)
>callContract @1RolesDelete {"Rid": 24, "Ops": "D"}

{
    "block_id": 1785,
    "hash": "1ebf99a04f504fc3d2...4ecfbdfc419bf3dbf39df0013dca913f844",
    "penalty": 0,
    "err": ""
}
Issuance of Token
Create Ecology
Create an ecosystem, call @1NewEcosystem contract
>callContract @1NewEcosystem {"Name": "Test Ecosystem"}
{
    "block_id": 1787,
    "hash": "384f35ef93243c9dd4f53b9298873b356b25b31cf7c6a6be7600ee7694d77006",
    "penalty": 0,
    "err": "21"
}
Then we modify the command line tool configuration to log into this newly created ecosystem: "21"
Installing Basic Applications
Call the contract to install the base application, as follows:
1  >callContract @1PlatformAppsInstall
2  >callContract @1RolesInstall
3  >callContract @1AppInstall {"ApplicationId": 5}
4  >callContract @1AppInstall {"ApplicationId": 6}
Line 1, install the platform application Line 2, install default role Line 3-4,
install the eco-configuration and token issuance application, where the
application id 5,6 can be queried via getList as follows:
>getList @1applications -w={"ecosystem": 1, "$or": [{"name": "Token emission"},{"name": "Ecosystems catalog"}]} -c="name,ecosystem"

{
    "count": 2,
    "list": [
        {
            "ecosystem": "1",
            "id": "5",
            "name": "Token emission"
        },
        {
            "ecosystem": "1",
            "id": "6",
            "name": "Ecosystems catalog"
        }
    ]
}
Token Issuance
Because it is a new ecosystem, you need to set up the token issuance, call
@1TeSettings contract to specify the roles that can issue tokens
>callContract @1TeSettings {"RoleDeveloper": 30}
where RoleDeveloper is the current ecosystem role id, which can be obtained
through the @1roles data table
Token Issuance Call @1NewToken contract to issue tokens
>callContract @1NewToken {"Symbol": "TEST", "Name": "TEST Coin", "Amount": "10000000000000000" ,"Digits": "12"}
where the contract parameters Symbol is the token symbol, Name is the token
name, Amount is the total amount, and Digits is the precision.
Token Emission
>callContract @1TeEmission {"Amount": 1000000000000}
Destroy tokens
>callContract @1TeBurn {"Amount": 1000000000000}
Default token increment and token destruction is allowed, you can set it off by
@1TeChange, where TypeChange is the type (emission increment,withdraw
destruction). Value is the on/off status (1 on, 2 off), e.g: Close
Additions Note: Cannot be turned on after closing
>callContract @1TeChange {"TypeChange": "emission", "Value": 2}
Turn off destruction, if you want to turn on destruction again, just set
Value to 1.
>callContract @1TeChange {"TypeChange": "withdraw", "Value": 2}
Eco Deduction
Before setting up eco-deductions, you need to understand the IBAX fee model, which can be found in the white paper.
We first set the eco-wallet address, call the @1EditParameter contract and
modify the eco-parameters
>callContract @1EditParameter {"Id": 334, "Value": "1273-2644-xxxx-5846-6598"}
where Id is the ecowallet ecosystem_wallet parameter id, which can be
queried as follows:
>getList @1parameters -w={"ecosystem": 22, "name": "ecosystem_wallet"}
The Value value is the address of the ecowallet that will be bound, and the
contract generates the gas fee, which is paid by that address. The address must
have enough tokens in the current ecosystem and needs to be agreed by the bound
address before the modification will be successful
Call @1EcoFeeModeManage contract to set up multi-ecosystem deduction, as
follows:
>callContract @1EcoFeeModeManage {"FollowFuel": 0.01, "CombustionFlag": 1, "VmCostFlag": 2, "VmCostConversionRate": 100, "StorageConversionRate": 100, "StorageFlag": 2, "ExpediteFlag": 1}
where the contract parameter fields are defined as follows:
FollowFuelparameter is a multiple of the follow eco1 rateCombustionFlagwhether to turn on ecotrade gas fee combustion, 1- no, 2-yesCombustionPercentCombustion percentage, only effective when gas fee combustion is turned on, takes values 1 to 100, 0 when not turned onVmCostFlagVM cost flag, set direct or proxy payment, 1 - direct payment, 2 - proxy paymentStorageFlagstorage fee flag, set direct payment or proxy payment, 1 - direct payment, 2 - proxy paymentExpediteFlagExpedited fee flag, set direct payment or payment on behalf of, 1 - direct payment, 2 - payment on behalf ofVmCostConversionRateVirtual machine cost conversion rate, 2 decimal places, only in effect for proxy payments, greater than zeroStorageConversionRateThe storage cost conversion rate, 2 decimal places, only in effect for proxy payments, greater than zero
If you use the above settings, all transaction fees incurred by users invoking contracts within the ecosystem will be paid by the ecosystem wallet of the current ecosystem setup. All users only need to pay for the gas costs incurred within the ecosystem. Of course you can adjust the cost parameters according to your actual needs
DAO Governance Ecology
Before modifying to DAO governance ecosystem, you need to ensure that the current ecosystem has issued tokens, and after modifying to DAO governance ecosystem, all proposals of the ecosystem will be voted on by the members of the governance committee. The DAO Governance Board is no longer managed by the eco-developers alone, and the top 50 representatives of the eco-holdings are elected.
Call the @1EditControlMode contract to change the eco governance mode to DAO
governance mode.
>callContract @1EditControlMode {"Value": 2}
where the Value parameter 1 represents the creator model 2 represents the
DAO governance model
We can try to create an application
>callContract @1NewApplication {"Name": "testApp", "Conditions": "ContractConditions(\"@1DeveloperCondition\")"}
At this point a DAO governance proposal is generated and voted on by the DAO Governance Board before the application is created. A valid proposal requires a 68% approval rate out of 75% of the votes cast. The scope of DAO governance includes:
- Add, delete and change applications, contracts, pages, code snippets, tabs, menus, application parameters, data tables and fields
- Modify multilingual
- DAO and creator model switch
- Edit ecosystem parameters
- role, assign remove role members
- Issue additional destruction currency
- Modify the platform parameters
- Modify ecosystem information
- Modification of delayed contracts
- Modify the voting template
Deploy applications using application packaging tool
Before starting this tutorial, you need to download IBAX Application Packaging Tool , we need to use this tool to package IBAX application.
We need to store the application files according to the following directory structure
- APP Name
    - app_params
        params1.csv
        params2.csv
        ...
    - contracts
        contract1.sim
        contract2.sim
        ...
    - tables
        tableName1.json
        tableName2.json
        ...
    config.json
As shown below:
airdrop$ ls *
config.json

app_params:
dedicated_account.csv  lock_percent.csv  per_period_sec.csv  period_count.csv

contracts:
AddAirdrop.sim  ClaimAirdrop.sim  SpeedAirdrop.sim

tables:
airdrop_info.json
The app_params directory stores the application parameters file, named using
the parameter name + file format .csv, the content of the file is the
parameter value. The contracts directory holds the contracts, in .sim file
format, and the contents of the file are the contract source code. The tables
directory holds the application data table structure in json file format, as
follows:
[
  {
    "name": "account",
    "conditions": "{\"read\": \"true\", \"update\": \"ContractConditions(\"MainCondition\")\"}",
    "type": "varchar"
  },
  { "name": "balance_amount", "conditions": "true", "type": "money" },
  { "name": "stake_amount", "conditions": "true", "type": "money" },
  { "name": "surplus", "conditions": "true", "type": "number" },
  { "name": "total_amount", "conditions": "true", "type": "money" }
]
name is the datatable field name, conditions is the datatable field
permission, and type is the field type.
In step 1, we generate a config.json file and save it to the airdrop directory with the following contents:
{
    "name": "Airdrop",
    "conditions": "ContractConditions(\"@1MainCondition\")"
}
Where name is the name of the application, conditions: is the permission to
modify the application, and then save it to the airdrop directory.
Step 2, package the application, the following command will generate the
application airdrop.json in the current directory, if you modify the contract
or application parameters, you need to repackage the application.
$ ./app-tool airdrop/
We can import the application via
command line tool as follows: Use the
import command to import an application, with the -f parameter to specify
the application file to be imported
$ ibax-cli console

Welcome to the IBAX console!
To exit, press ctrl-d or type exit

>import -f ./airdrop.json
Of course if you have an application, you can also generate the complete directory structure with the following command
$ app-tool.exe airdrop.json